Wednesday, December 31, 2008

Full circle, almost

IMG_6890

My first post of the year was Oatmeal-Raisin cookies, and I'm ending 2008 with more cookies.

I guess that was a bit of a premonition about what my habits would be for the year, with cookie recipes now equaling muffin recipes, with 7 cookie recipes posted this year.
Make that 8 now.

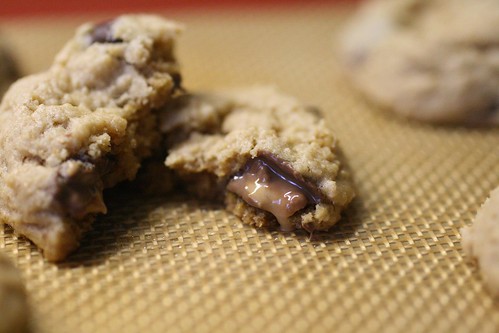
I was not planning on making cookies today, but when I went to Trader Joe's today, I saw Miniature Milk Chocolate Peanut Butter cups. They were too cute to resist, and at the same price as a bag of chocolate chips for 12 ounces, too easy to toss into my basket. I figured I could use them in cookies of some sort.

Then it was crunch time. I told my parents I'd have a clean kitchen for them (I made banana muffins and espresso candied walnuts today) when they got home, I had to pick out what cookies I was going to make. I had just thrown out the bag from some Hershey Kisses and remembered that there was a recipe for peanut butter blossoms on the bag. I figured I could just use that as my base dough and work my way from there.

Quick, easy, and by the time my parents got home 30 minutes later, the last pan was in the oven.

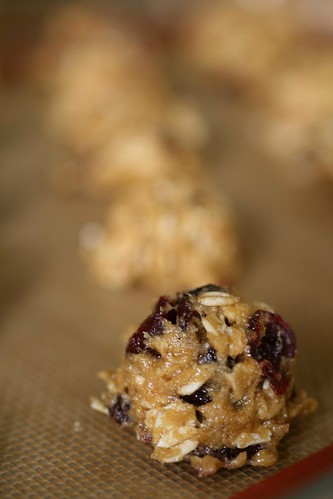
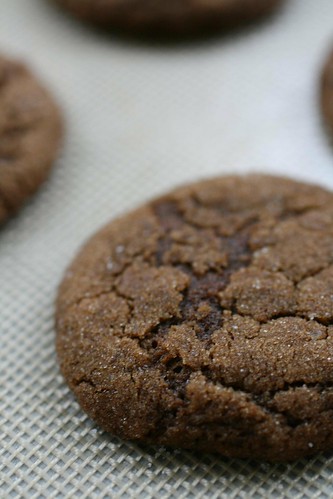
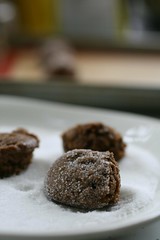
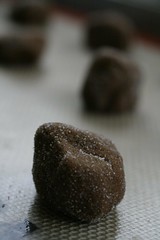
Peanut Butter Cookies with Peanut Butter Cups
makes 30-40 cookies
Note: If you can't find mini peanut butter cups (I haven't seen them anywhere but TJ's), you can omit them or substitute chopped peanut butter cups or chocolate chips. Milk can also be used instead of buttermilk.
I also think this dough would work for thumbprints, but I haven't tried yet. I've yet to find a dough that I like for them.

1/2 cup (1 stick, 4 oz) butter, softened
3/4 cup (186 grams) creamy peanut butter
1/3 cup granulated sugar
1/3 cup packed brown sugar
1 egg
2 tablespoons buttermilk
1 teaspoon vanilla extract
1-1/2 cups whole-wheat pastry flour or all-purpose flour
1 teaspoon baking soda
1/2 teaspoon salt
12 ounces (1 package) mini peanut butter cups

Preheat oven to 375ºF. Line 3 cookie sheets with parchment or baking mats.

In a large bowl, beat the butter, peanut butter, and sugars on medium speed until combined. Beat in egg, buttermilk, and vanilla extract.
Whisk together the flour, baking soda, and salt.
Stir the flour mixture into the peanut butter mixture until combined. Stir in the mini peanut butter cups.

Drop rounded teaspoons of the dough onto prepared baking sheets spaced 1" apart. Bake for 10 minutes or until bottoms are lightly browned.

Wednesday, December 24, 2008

Baby, It's Cold Outside

IMG_8429

The temperature here has dropped twenty degrees today, so it feels cold out.
But if you plan to venture on out or still need a nice gift for the holidays, I have a few suggestions.
Granted, you would have to have the ingredients on hand and a bit of time. And it is Christmas Eve.

Candied Espresso Walnuts shown above
Christmas Mice
Super Easy Cream Cheese Truffles
Green Tea Sandwich Cookies
Pumpkin Oatmeal Cookies
Ginger Crackles
Pistachio Cranberry Icebox Cookies (or shortbread) - these are one of my neighbors favorites out of my cookie box
Pecan Tassies


But if you are looking for a nice little edible gift, the walnuts are my favorite. They're super easy to make, take about half an hour start to finish (well, 45 if you let things cool), and they make the house smell like a coffee shop. Or at least that's how mine smelled before dad started cooking brussels sprouts.

Sunday, December 21, 2008

Mice for Christmastime

IMG_6711
My grandmother has been making mice for about a decade.
Yes, I said mice.
Like the one in the picture above. Except she didn't make it. Keri and I did. It was a team effort.

IMG_6704

She taught me how to make them about six years ago, and the following year my friend Keri and I made them together. I'm not sure if we've made them since eighth grade (when I made a step-by-step tutorial, but this year we finally got around to making them again. And they're so adorable and fun to make!

Keri and I don't see all that much of each other. We see each other at lunch and in history, which is most all through high school, but it was fun to get together. And so the mice took four hours. But don't let that scare you. We easily could have been done in an hour, but we talked, ate lunch, and found fun ways to use the leftover chocolate- we crushed up candy canes to mix in and then poured the chocolate into molds.
IMG_6727


IMG_6734IMG_6739
Chocolate mice sort of instructions:
I have no clue about quantities, but we used 3 10-ounce jars of maraschino cherries, a 17.6 ounce bar of milk chocolate, part of a 12-ounce bag of slivered almonds (the smallest size should be fine, we needed 204 almond slivers that looked nice), 1 1/2 bags of Hershey kisses (the 11 ounce ones, or 102 hershey kisses), and part of a tube of red gel icing. The numbers were based on how many cherries with stems we ended up with, and that's what we ended up with.
Melt the chocolate, dip the cherries in, push the kiss on, stick in the almonds. Repeat. Place in fridge to harden up for a while, and then dot on eyes. For better instructions, see my how-to from eighth grade.


Last three pictures by Keri. She was having fun with the camera.

Sunday, December 07, 2008

Chocolate and Cream Cheese = Truffles

IMG_6219
It's a fact. When I have a paper, I find ways to avoid working on them.
Okay, it's called procrastination and I'm sure we're all subject to it, but at least, well, okay, sometimes, I actually do something productive while avoiding what I should be working on.

Not that it's premeditated or anything. I was going to make Peppermint Cheesecake Brownies, but I wasn't sure what to do with the extra egg yolks that I would have leftover, and it seemed like it would be an hour of devotion at once.

Which is funny. Because that's how much time I ended up spending on something that I thought would be so much faster and easier. Which it was. Easier that is. Or at least simpler. Because it had two ingredients. I tried making it three, but that was a bad plan (and makes me glad I didn't make the peppermint cheesecake brownies).

The Philadelphia Cream Cheese coupon in the sunday paper had a recipe for truffles in it. I grabbed it for the coupon ('tis the season for tassies) but then realized it had a recipe (if you can even call it that) for truffles.

And they were surprisingly tasty.

IMG_6216
Truffles!

1 8 oz. package cream cheese, softened
8 ounces semi-sweet chocolate, melted
12 ounces semi-sweet chocolate (melted but later on)
decorations, optional

Beat the cream cheese until fluffy and beat in the chocolate. Chill until firm enough to handle (mine didn't need chilling, it set up pretty fast in my cold house) and then scoop and shape teaspoonfulls into balls.
Chill for half an hour or so, and then dip into melted chocolate and place on a sheet of wax paper or silicone mat (and top with sprinkles if desired).
Refrigerate for a few hours until chocolate is set.

Thursday, November 27, 2008

Happy Thanksgiving

IMG_5768


Mmm. Thanksgiving.
Actually, it's really not the tastiest holiday. I don't really like turkey, or gravy.

But cranberries. I do love cranberries. And oranges. Cranberries with oranges.
CRANBERRY ORANGE RELISH!

Every since Mom first made this cranberry relish about 8 years ago, I've been wanting it every year. So, for the past four years, so ensure I get it, I've been making it.

But for some reason, I failed to double the recipe this year. Oops. I'll just have to make some more tomorrow. Leftover sweet potatoes are no good without cranberry relish on top.

The food isn't what I like about Thanksgiving though (relish aside). It's my family. And no, I'm not trying to be a Hallmark card. I'm serious. Especially after dinner when we play games. Last year we played Catchphrase. Hilarity ensued. But there's an odd number this year.

IMG_5774
Cranberry Orange Relish
adapted from the November 2001 issue of Gourmet (I think Mom made the entire menu that year)
Makes about 2 cups

1 (12-ounce) bag fresh cranberries
1 navel orange
1/4 cup sugar
1/2 teaspoon cinnamon

Place the cranberries, sugar, and cinnamon in the food processor. Zest the orange over the food processor, and then peel the orange and separate the segments from the pith and toss them into the food processor too (the segments, not the pith. That would be nasty.) Pulse until it's all chopped up.
Refrigerate for at least two hours to let flavor develop. And then hoard it.
Or be nice and serve it.

I'd recommend doubling this recipe if you have someone who relishes it as much as I do. Gourmet says it serves 10, but who are they kidding?

Sunday, November 23, 2008

It Smells and Tastes Like Fall Now


My friend Lauren really likes pumpkin bread. Or so she says. I've never actually seen her a room with pumpkin bread. So I told her I'd make some. And then about 10 minutes later, I realized it would be hard to give to her, and pumpkin bread is so much tastier (in my opinion) in the morning. And I usually see her in the afternoons.
So I made those pumpkin bites from last year, which are essentially miniature pumpkin muffins. And they sustained her through a frustrating Calc study session. (Aren't you glad you are out of high school?)
But I was determined to get a pumpkin cookie down. So I turned to the banana-oatmeal cookies I've made far too many times. Because if they work for bananas, why not pumpkin?

It turned out to be harder than I thought. The first few batches, while tasty, nobody could ever identify the pumpkin in them. By batch 4 or 5, I'd found the secret. Ginger and toasted pecans. For some reason, the ginger and pecan flavor is reminiscent of fall and pumpkins. Or maybe I'm just crazy.

Either way, you should try these cookies.
Did I mention they're also super easy?

Spiced Pumpkin Oatmeal Cookies
makes 30 or so small cookies

1 cup (130 g) whole-wheat pastry flour, or all-purpose flour
1/2 teaspoon baking powder
1/2 teaspoon baking soda
3/4 teaspoon cinnamon
1/2 teaspoon ground ginger
1/4 teaspoon nutmeg
1/4 teaspoon salt
2 Tablespoons canola or vegetable oil
1/2 cup granulated sugar
1/2 cup lightly packed brown sugar
1/4 cup + 1 tablespoon (85 g) pumpkin puree
1 egg
1 tsp vanilla extract
1 1/4 cups oats (130 g)
1/2 cup chopped pecans, toasted
1/3 cup dried cranberries (Craisins)
1/3 cup white chocolate chips or 2 ounces white chocolate, chopped

Preheat oven to 350ºF and line a baking sheet with parchment paper or a silicone baking mat.
In a small bowl, whisk together the flour, baking powder, baking soda, cinnamon, ginger, nutmeg, and salt. Set aside.
In a large bowl, whisk together the oil, sugars, and pumpkin puree until smooth. Whisk in egg and vanilla extract.
Stir in flour mixture. Stir in the oats, pecans, dried cranberries, and white chocolate.

Drop by tablespoonfuls on the prepared baking sheet and bake for 12-15 minutes, or until tops are dry and edges are lightly browned. Let cool on pan for 5 minutes, then transfer to rack to cool completely (or enjoy immediately.)

Tuesday, November 11, 2008

Green Tea Sandwich Cookies

IMG_5612

My friend's mom recently came back from Japan and with her she brought Green Tea KitKats. They're like normal kit kats, except the filling is matcha flavored, and the coating is a matcha white chocolate.

At lunch yesterday, when my friends and I got to talking about how tasty the kit kats were (and how long it had been since any of us had green tea ice cream). I said I'd make green tea ice cream, but then realized it would be hard to take it to school with me. So I decided to try to make cookies with a green tea filling instead.

I'd thought about making green tea sandwich cookies before when I saw a recipe somewhere, but never did. I just didn't feel like getting on the computer. So I turned to my Biggest Book of Cookies that one of my friends gave me for my birthday and looked for something similar to what I wanted. I usually don't like to make cookies that involve more than mixing, dropping, and baking, but I was inspired. And my two hours of work yielded only 22 cookies (there were more cookies, enough for closer to 30 sandwiches, but I ran out of filling and was too tired to make more; it was 10:30 at night).

I decided against dipping these rich, buttery cookies in a green tea-flavored white chocolate because they're fairly delicate, and delicious just the way they are. Hopefully my friends will like them!

IMG_5609
Green Tea Sandwich Cookies
makes about 30
(adapted from a French Pistacho Buttercream recipe in Better Home & Gardens Biggest Book of Cookies)

Cookies:
3/4 cup (1 1/2 sticks; 6 oz) unsalted butter, softened
1/2 cup powdered sugar, sifted (or sift into bowl with butter)
1/2 teaspoon salt
1 egg
3/4 cup all-purpose flour
3/4 cup whole-wheat pastry flour
Granulated sugar (for coating)

Filling:
1/4 cup (1/2 stick, 2 oz) unsalted butter, softened
1 teaspoon matcha (green tea) powder

To make cookies:
In a mixing bowl, beat 3/4 cup butter on high for about 30 seconds. Add 1/2 cup powdered sugar and salt, beat until fluffy and combined. Beat in egg. Beat in flour on low, or stir it in. Cover and chill dough about 1 hour, or until easy to handle.

Preheat oven to 350ºF.
Using a teaspoon, shape dough into balls. Place on a cookie sheet (lined for easy cleanup, but it doesn't need greased regardless). Use the bottom of a glass dipped in the dough and then sugar to flatten each ball into a 1 1/2-inch circle.

Bake for about 8-12 minutes, or until bottoms are lightly browned. Transfer cookies to a wire rack and let cool completely.

While the cookies cool, make the filling:
Beat the 1/4 cup butter, 1/2 cup powdered sugar, and green tea powder until light green and fluffy.

To assemble the sandwiches, spread about 1/2 teaspoon filling on the flat side of one cookie and top with another. If you prefer more filling, double the buttercream recipe.

Monday, October 27, 2008

How My Pumpkin Themed Night Was Squashed

IMG_5467

It all started when I was flipping through my copy of Great Food Fast and saw a butternut squash soup recipe with spiced toasted pumpkin seeds about two weeks ago. I had to make it, and it had been a while since I'd cooked dinner for my family. It hit me: make a three-coursed themed dinner.

Which is way too overambitious for me, especially with papers for school and college applications looming over me. But I figured I'd need a release.

I figured wrong. Later that week, my friends and I decided to make shirts for math team, and Saturday night was the only time. So I made plans for that evening - after dinner, that is. Which put dinner on a deadline.
IMG_5426_

I don't cook so well under pressure. Which is probably why when I first started, I made muffins in the afternoon. Okay, that's baking, but you get the point. There's no pressure.

On Wednesday, I picked up the October Bon Appetit, flipped it open, and it landed on the page with the Pineapple Upside-Down Pumpkin Gingerbread Cake (try saying that three times fast) and was hooked. I had the outer ends of my meal, all that was missing was the main course.

Which was picked out on Saturday once I returned from the last farmer's market of the season, and the grocery store. I had kale, and flipped through Veganomicon for ideas. I found something that used up the kale I'd just bought, and fit with my theme: Kale and Potato Enchiladas.

So, now that there's an insanely and unnecessarily long set-up, I'll sumamarize what went wrong in one word: timing.

I managed to get the soup and cake done no problem, unless you count the shopping for the cake*, but mom got home with the potatoes (and chili powder that I discovered we were out of) a bit later that I'd expected, which pushed things back a bit. At least I realized that it wasn't going to come together before it got too late, and the enchilada sauce and cooked potatoes were set to cool, and the sauteed onions were served with the soup. A loaf of rosemary bread thrown into the mix, and we had a nice light, overly gingered, autumn meal. Though I can't say I'll make the soup again.

And the cake. It lasted less than 24 hours.

*My local supermarket is well-stocked. But frozen pineapple juice concentrate? Nope. I could get Pineapple-Orange or Pineapple-Apple-Orange.


Pineapple Upside-Down Pumpkin Gingerbread
adapted from Bon Appetit October 2008
serves 10

Topping:
Nonstick vegetable oil spray
2/3 cup (packed) golden brown sugar
1/4 cup (1/2 stick) unsalted butter
2 tablespoons frozen pineapple juice concentrate, thawed (I cou
1 teaspoon mild-flavored (light) molasses
1 ripe pineapple, peeled (I used a peeled and cored pineapple)

Cake:
1 cup all purpose flour
1 cup whole-wheat pastry flour
2 teaspoons baking soda
2 teaspoons baking powder
1 1/4 teaspoons ground cinnamon
3/4 teaspoon ground ginger
1/2 teaspoon salt
1/4 cup (1/2 stick) unsalted butter, room temperature
3 Tablespoons vegetable oil
1 cup sugar
2 large eggs
1/2 cup mild-flavored (light) molasses
1/2 cup canned pure pumpkin
1/2 cup boiling water

Sunday, October 05, 2008

Commotion in the Ocean: Cupcakes for Homecoming

IMG_4626

My friends told me that I had to go to the homecoming dance this year. Really go. As in with them. Not just be there, as that presence in a dress running around in her practical heels, awkwardly taking pictures of people doing things that pictures should never be taken of.

Which put me an unknown position. But one that has absolutely nothing to do with food. So I'm moving on. But I will say that the homecoming dance, while the music left something to be desired, was still fun with my friends, before, during, and after. Nothing beats singing I Want In That Way at the top of your lungs at school and then later trying to learn the Soulja Boy dance in the privacy of your friend's room.

IMG_4610

But oh, yeah. The cute cupcakes. The theme for homecoming prompted me to try to make the Shark Attack cupcakes from Hello, Cupcake. But they would have been a pain to make, I didn't have time to go get black food coloring at Michael's, and, plus, they probably wouldn't have tasted all that great anyway.

IMG_4604

Cute little cupcakes made with my go-to cupcake recipe, and a buttercream that involved butter, powdered sugar, water, and blue food coloring until the desired consistency/color was reached and topped with goldfish: much simpler and tasty.

So I enjoyed the football game, where my school actually won its homecoming game. That hadn't happened since I started high school.
IMG_4635


Saturday, September 20, 2008

Cornmeal Peach Cake


I'm not sure what sparked my interest, randomly on a Friday afternoon. I was walking home from school, and decided I really wanted to make a cake with cornmeal in it. I was pretty sure I had cornmeal at home, had no recipe in mind, and wanted it to include fruit and honey.

I stopped at the grocery store, saw some smelly peaches, and knew what I was going to make.

Then I searched online, found a recipe, and tried to follow it. But the container of yogurt in the fridge turned out to be practically empty. Who puts a spoonful of yogurt back in the fridge? In our house the container usually gets licked clean!

But I wasn't around to see how the cake turned out, and while busy getting ready in my room to head out to the freshmen dance at school, I overcooked the cake. My expectations were low, and I put it on the counter to cool. As soon as my mom came home when the car, I grabbed my camera, told her about the cake, and headed to school.
IMG_4354When I got home with a headache two and a half hours later, the cake was practically all gone, with just a sliver saved for me. Apparently my Dad had to fight to save it. It was a hit with the seven people sitting out on the porch.

I guess those are results that say that my experiment worked.

Peach Cornmeal Cake
75 g AP Flour
78 g cornmeal
1/2 tsp cinnamon
1/2 tsp baking soda
1/8 tsp salt
60 g butter, softened
75 g granulated sugar
30 g honey
1 large egg
55 g plain yogurt
1 to 2 peaches, sliced in segments (though raspberries or nectarines would also be tasty)

Preheat oven to 350ºF. Grease a 9" round cake pan.

Mix together dry ingredients in a small bowl. Cream the butter and sugar in a bowl until fluffy. Beat in the honey and egg. Stir in half of the flour mixture, then the yogurt, and then the remaining yogurt until just combined.

Pour batter into cake pan. Top with peach segments arranged in a single layer.

Bake in 350ºF/180C oven for about 20 minutes.

Sunday, September 14, 2008

Extra Egg Whites... Tasty "Flan" For Breakfast

IMG_3958


Sometime early in August, I found a tea shop in Chinatown that had green tea powder (or matcha). I've been looking for the powder for over a year now, and was thrilled to finally find it. A few days later, I made the green tea ice cream from David Lebowitz's book for a friend. It was delicious.
IMG_4298

But the usual problem with making ice cream: inordinate amounts of egg whites are leftover. And it isn't that egg whites don't have uses, but I just normally don't have the time or the other ingredients to do something with them within a day or two of making the ice cream.

So why not plan ahead? I know, that would be a terrific idea. But it doesn't always work out that way. This time it did. So I made the flans in the morning, ended up with four egg yolks leftover from it, so at the end of the day, I just had two egg white leftover, and they contributed to the chocolate mousse I made a day or two later.
IMG_3684IMG_3705

I'd been wanting to try these flans, and not seeing a time when I could make them for dinner with something else, I figured I might as well just make them for breakfast. I used some really tasty tiny red and yellow tomatoes I picked up at the farmer's market and basil I stole from our neighbor's garden. They turned out tasty too.

I also made a single large version instead of individual ramekins of them the next time I had the egg white problem (though I had a LOT of egg whites that time, so this didn't even make a dent in them) since I don't actually own the right size cups. It turned out nicely too.


IMG_3726_
See original recipe here.

Friday, September 12, 2008

Is four loaves in a month a bit obsessive?

And that's not even including the 48 "muffin loaves."

IMG_3782

I've been waiting all summer for zucchini at the market, and when it finally showed up, I'd found the perfect recipe to try. Heidi's Special Zucchini Bread looked a bit different, and, I guess to use it's name, special.

So I gave it a try, almost following the recipe exactly the first time, just omitting the lemon zest because I had no lemons (and could only find the ones with the neon green letter emblazoned on them) and crystallized ginger because, though I had it, am not a big fan of it. I bought what looked like a promising "east meets west" curry powder, and set out to try the recipe. And I augmented the few walnuts I had on hand with brazil nuts.

And it was tasty. At the first bite, I was unsure about the curry powder flavor, but by the second muffin I was sold. I had the two of them for lunch, and froze the rest. They really do freeze quite well.

The next time I made them, I omitted the poppy seeds, and once again used half walnuts and half brazil nuts, and made it with 2 ounces of butter and 2 ounces (in weight) of canola oil, and added some raisins. It was also good this time.

With it looking promising with the oil, I made it once again after my first Friday of school, but this time, used only oil. I beat the sugar with the eggs, and then added the oil. But the batter seemed oily. Before I stirred in the nuts (and after adding all the raisins I had in the house, about half a cup), I split the batter. Into one half, the half that ended up in the loaf pan, I put about 4 ounces of blue cheese that I had a wedge of sitting in the fridge that I feared would go bad. It turned out quite nicely. Different, but not at all unpleasant.
I did the usual thing with nuts in the other half, that became square muffin loaves.
But the all oil ones were a bit more dense. Maybe it was because of the splitting I over stirred them, or maybe it was the oil. Either way, when I made the bread for the fourth time this past Sunday, I started with two tablespoons of butter, beat that with the sugar, and then beat in 1/4 cup canola oil (I almost used walnut, which may have been an equally nice choice), and then continued with the recipe as Heidi had instructed, only sticking with my raisins and brazil nuts.

I think I've finally got it down. And I have a good 15 or so muffins in the freezer still.

Formerly Heidi's Zucchini Bread
makes one large loaf and twelve small square ones, or one normal loaf and twelve muffins

2 Tablespoons unsalted butter, softened
210 grams (about 1 cup) granulated sugar
105 grams (about 1/2 cup, packed) brown sugar
1/4 cup canola oil, or other neutral oil
3 large eggs
2 teaspoons vanilla extract

3 cups grated zucchini (about 2 large), with some moisture squeezed out and fluffed back up

385 grams (about 3 cups) whole wheat pastry flour
1 1/2 teaspoons baking soda
1/2 teaspoon baking powder
1 teaspoon salt
1 teaspoon cinnamon
1 Tablespoon curry powder

6 ounces (about 1 cup, 170g) brazil nuts, chopped
3 ounces (about 1/2 cup, 85g) walnuts, chopped
70 grams (about 1/2 cup) raisins

Preheat oven to 350ºF and place a rack in the middle. Line one loaf pan with parchment (overhanging over sides for easy removal) or greased and floured, and grease 12 muffin cups.

In a large bowl or bowl of a mixer, beat the butter about 15 seconds, until fluffy. Add the sugars and beat again for about 30 seconds to a minute, or until the sugar starts to incorporate. Add the oil, and beat until it's incorporated. Add eggs, one at a time, mixing well and scraping down sides between each addition. Stir in the vanilla and then the zucchini.

In a medium bowl, combine the flour, baking soda, baking powder, salt, cinnamon, and curry powder. Add the dry ingredients to the wet ingredients in two batches, stirring between each addition. Don't overmix the batter, since the nuts still have to be stirred in.

Fold in the raisins, and about 3/4 of the nuts. Save some of the nuts to sprinkle on top of the load.

Portion batter into each of the twelve muffin cups. Pour remaining batter into loaf pan and smooth top. Sprinkle loaf with reserved nuts.
Bake the muffins and loaf side by side, removing the muffins after 15-20 minutes or until the spring back when lightly touched, and the loaf after 40-45 minutes.
Let cool in the pan for 10 minutes and then turn out onto wire racks to cool completely.

Enjoy, or freeze for later enjoyment.

Sunday, August 24, 2008

Friday, August 22, 2008

Chocolate Mousse Cake

IMG_3771

My friend Kate and I were walking around and I stopped at Whole Foods to pick up some eggs. As we walked towards the register, Kate commented about how fascinating the water aisle is and I remembered a $4 .5 liter bottle of water I'd seen. I couldn't find it though, so I walked us over to the refrigerated water. It still wasn't there.

However, in the process, we walked past the bakery case. "I can't look at it," Kate had said. Me, being the mean friend I am, asked her why not. "Because I always want to buy one." So I told her to pick one out and I'd make it. She picked out one with a flower on top, and then a different one called "Death By Chocolate" and then looked at a mango lime mousse cake. "That seems too weird."

We settled on a chocolate mousse cake. And here it is:

IMG_3754_
Chocolate Mousse Layer Cake
(cake adapted from The Cake Book by Tish Boyle, mousse from Cooking Light, and ganache from The Cake Book)
makes 1 5" square cake

For cake layers:
2/3 cup (80 g) all-purpose flour
1/4 cup + 2 Tablespoons (30 g) natural cocoa powder
5/8 teaspoon baking powder
1/4 teaspoon baking soda
1/8 teaspoon salt
3/4 cup + 1 Tablespoon (176 g) granulated sugar
2 Tablespoons + 2 teaspoons (40 ml) vegetable oil
1 large egg
2 Tablespoons + 2 teaspoons (40 ml) whole milk
1 teaspoon vanilla extract
1/2 cup (120 ml) boiling water

For chocolate mousse:
1 (12.3 oz) package firm silken tofu
4 1/2 ounces bittersweet chocolate, melted
2 large egg whites
1/4 teaspoon salt
1/2 cup sugar
1/4 cup water

For bittersweet chocolate ganache:
6 ounces (170g) bittersweet chocolate, chopped
2/3 cup heavy cream
1 teaspoon vanilla extract

To make cake:
Position a rack in the center of the oven and preheat oven to 325ºF. Line a 10-inch square baking pan or 2 9x5 inch loaf pans with parchment and grease bottom and sides of pan and dust with flour.

Sift together the flour, cocoa powder, baking powder, baking soda, and salt into a medium bowl. Whisk in the sugar. At a low speed, using a mixer, beat in the oil for a few seconds until dry ingredients are crumbly.

In a small bowl whisk together the eggs until blender. Whisk in milk and vanilla extract. With the mixer at low speed, add egg mixture to flour mixture and mix until blended, scraping down sides of bowl as necessary. Gradually add the boiling water and mix just until blended and smooth. Pour the batter into the prepared pan (or pans.)

Bake the cake for 25 minutes (for two loaf pans) or until toothpick inserted in center comes back clean or it bounces back if lightly touched. Cool the cake in the pan on a wire rack for 10 minutes. Invert the cake onto the rack (or using parchment paper, if made withe handles, remove) and cool the cake completely.

To make the mousse:
In a food processor, mix together the tofu and melted chocolate until smooth, about two minutes.

In a medium bowl, beat the egg whites and salt until stiff peaks form. In a small saucepan combine sugar and water and bring to a boil. Cook, without stirring until a candy thermometer reaches 250ºF. Slowly pour syrup into the egg whites while beating.

Fold in 1/2 of the meringue into the chocolate tofu mixture. Fold in remaining meringue, cover with plastic wrap, and store in refrigerator until ready to use.

To assemble cake:
Cut cake into four squares (or each loaf cake in half). Place on a small piece of cardboard cut to size and top with 2/3 cup of mousse. Place in freezer for fifteen minutes. Top with cake layer and mousse. Freeze for fifteen minutes; repeat with remaining cake layers. Freeze for thirty minutes after final layer of mousse.

Meanwhile, in a small saucepan, bring 2/3 cup cream to a simmer. Remove from heat and stir in 6 ounces chopped chocolate until smooth. Stir in vanilla extract. Let sit ten minutes.

Place cake on a wire rack and pour chocolate ganache over it. Spread to cover top and sides of cake. Decorate with whipped cream and chocolate curls if desired. Refrigerate for at least 2 hours before serving.

Tuesday, July 22, 2008

Simple Summer Veggie Boules

IMG_3531

Yes. They require the stove.
But most of the work is chopping and hollowing out little rolls (if you can find them), so it's quite meditative. And the work on the stove is painless.

Last weekend I was at the library looking for a cheesecake book immediately following my yard-sale find: a mini cheesecake pan. I did find the book, but didn't check it out.
Instead, I checked out the Tassajara Cookbook because the picture on the cover of some sort of marinated tofu looked so fresh and bright. Or maybe it was just the overall look of the picture. I know, I know. Don't judge a book by the cover. But what else am I supposed to judge it by when I'm skimming the racks of new books at the library?

I picked out a few recipes from the book to try. The book mostly consists of spreads and dips and the likes (or at least the first two chapters, which is as far I read before having found things I wanted to try.) This also happened to be two days after cilantro, jalepenos and serranos were all suspect and before jalepenos were confirmed as the culprit, so I wasn't sure if I'd be able to find jalepenos or cilantro at the store. Which ruled out two of the things I'd wanted to try: Garlic, Cilantro and Chipotle Hummus and Anka's Roasted Red Bell Pepper Spread with Chiles and Lime (the latter being a double whammy.)

So I wrote a grocery list with three possibilities, depending on what looked good. I was really hoping to try the fig and kalamata olive tapenade since I'd had some tasty figs the week before, but that day the figs looked gross.

But I digress. I finally settles on two options: making the vegetable tapenade and stuffing it into hollowed out tiny rolls that I found in the deepest clutches of our freezer and caper-garlic hummus.

The vegetable tapenade is a keeper. Somehow, I didn't imagine it making so much, even though the recipe did say "Makes 4 cups." I think I may have ended up with more. I may have used more leek than it called for. Regardless of the quantity, it was tasty! And great wrapped in a lettuce leaf with fresh ricotta the next day. And wrapped in a lettuce leaf with leftover lamb the day after that.

What to do with it is up to you.

Sweet Veggie Tapenade
from Tassajara Cookbook: Lunches, Picnics, and Appetizers


Note: I returned the book to the library before copying down the recipe... Not my brightest move. But the book is on amazon, and it is one you can "look inside" of.

Sunday, July 13, 2008

Little Bites of Cheesecake

IMG_3477


Sometimes things just happen right.

Yesterday Mom asked me if I would help her make some appetizers for a meeting she had today, and I was thrilled to help. (I ended up making assorted dips and some vegetable boules) but of course it is dessert I love making. Any excuse to make lemon curd is good with me. But I didn't make lemon curd.

IMG_3463IMG_3490
IMG_3488IMG_3511


I digress. The kismet thing. There was a yard sale we came across on our way to the farmer's market. I stopped to look and found a mini cheesecake pan. My plans for lemon curd tarts went out the window. How awesome would it be to make mini cheesecakes!

So that's what happened. And I still could have made lemon curd, but I had a jar (it's too eggy for me) in the cabinet, so I just used it and focused on cleaning up the kitchen instead.

IMG_3497
Mini Lemon Ricotta Cheesecakes
makes 12 mini cheesecakes

Note: I adapted this from a Amy of Eggs on Sunday who adapted it from a recipe from Bon Appetit that doesn't require this special pan. It required ramekins, which I don't have.

Crust:
16 graham cracker squares (about 4 1/2 ounces)
3 Tablespoons butter, melted
1 Tablespoon honey or agave nectar
2 Tablespoons cold water

Cheesecake:
1/3 cup sugar
1/4 cup fresh lemon juice
1 Tablespoon finely grated lemon peel
8 ounces cream cheese or neufchatel , room temperature
1/2 cup (3 3/4 ounces/110 g) whole-milk ricotta cheese
1 large egg

1/3 cup lemon curd
1/2 pint fresh berries

Preheat the oven to 425. To make the crust, pulse the graham crackers in a food processor until finely ground. While running the processor, add the butter, honey, and water. Process until thoroughly moistened.

Divide the crumb mixture among the wells of the mini cheesecake pan (about 2 teaspoon to 1 Tablespoon per well) and press down firmly with fingers to flatten.

Bake the crusts for about 5 minutes until the crusts are turning golden brown and slightly puffed. Remove the pan and let cool slightly.

For the filling, beat together the sugar, lemon juice, and lemon peel until the sugar dissolves. Add the cream cheese and ricotta and beat until well blended, about a minute. Add the egg and beat until incorporated.

Divide the batter among the wells of the pan (about 2 Tablespoons each).

Place the cheesecakes in a 400ºF oven and bake for about 20 minutes, until puffed and set around the edges. Cool on a rack and then chill about two hours, until cold. The centers will cave a bit, but that's fine.

Unmold the cheesecakes, top with a dollop of lemon curd and garnish with berries.

Saturday, July 12, 2008

Broccoflower

IMG_3471_


I was so excited to see this spiky broccoflower at the farmer's market on Saturday. I'd been wanting to try it after coming across it working on a project about fractals.

It tastes like cauliflower. But it looks so much cooler!

Right now my age is obvious.

The Toughest Question

IMG_3443

The hardest question to answer, I think, is that "what is your favorite food?" question. I don't know the answer. It depends on the day. I used to say, definitively, that is was khorosht-e karafs, but now I'm not so sure. So then the interrogator moves on to their next question, unhappy with that answer.

What's your favorite type of food?

Uh, edible?

But no, of course that's what they mean.

They want an easy to digest answer, like Italian, Greek, Thai, Mexican, Middle Eastern, etc.

None of those answers satisfy me though. None of them really mean anything. Well, they do, but to different people they mean different things. Take Italian for example; for some people it conjures up images of red checkered tablecloths, pizza, and spaghetti and meatballs. To another person, it may conjure up fresh seafood dressed simply in olive oil and some vegetables following a course of fresh pasta tossed simply with rapini. The answers really aren't that simple.

And then what about American? What does that mean? I don't even want to try to wrap my head around that.

Like this dish. It has Asian flavors, but is it Asian? Highly doubtful. It was conjured up in test kitchens, and is tasty. But it fuses together flavors and different cultures and fresh ingredients and fits them nicely onto my plate.

Now that's my favorite kind of food.

As for the actual dish composed of the elements above, it jumped out at me when I was looking at the index of the August issue of Bon Appetit and had avocado in the basement on Monday and saw Asian Avocado Salsa. Dad however decided to make something that wouldn't go with the salsa, and the watercress at the store was droopy. Wednesday night, with the remaining avocado, I made a small batch of salsa based on the recipe, and as per one of the suggestions in the magazine, tossed it with some summer squash Dad grilled, soba noodles, and topped with (accidentally untoasted) sesame seeds.

IMG_3451
Asian Avocado Salsa
based on recipe in August 2008 Bon Appetit
makes about 1 1/2 cups

1 tablespoon rice vinegar
2 teaspoons mirin
1 teaspoon soy sauce
1 teaspoon sesame oil
1 teaspoon kosher salt
1 teaspoon wasabi paste*
1/2 cup chopped cilantro
3 green onions, thinly sliced on diagonal (about 3/4 cup)
1/3 cup 1/3-inch cubes jicama (about 1/2 4" jicama)
1 large avocado, halved, pitted, peeled, but into 1/3 inch cubes

In a medium bowl, whisk together vinegar, mirin, soy sauce, sesame oil, salt and wasabi paste. Stir in cilantro, green onions, and jicama. Gently stir in avocado.

*I used wasabi powder mixed with water to create a paste so I'm not sure in intensity how it compares to a purchased wasabi paste. However, if the salsa is mixed with pasta and vegetables, an extra 1/2 teaspoon or so does not hurt because the squash mellows it out.

Sunday, June 29, 2008

Gingered Rhubarb Trifle

IMG_3372_2

So I had good intentions last week when I bought two bundles of thin luminous stalks of rhubarb at the farmer's market, sensing that it may be my last chance this year. Then I got home, didn't have time to clean and prepare it to freeze, and just threw it into the fridge Siberia, and forgot about it. Except for the few stalks I used in a strawberry-rhubarb cobbler on Sunday.

A week later, I figured it would probably be dead. The stalks had gone limp, but most retained their vibrance and were free of wrinkles. And like I had thought, there was no more rhubarb at the market.

I was already making a marble cake for my cousin because he wanted one (nothing different, just a classic chocolate and vanilla marble cake in a tube pan,) so making a rhubarb cake would have been a bit of an overload, though after weighing my rhubarb I found I only had half a pound. I had leftover cupcakes from making a TV dinner, and whipped cream from making caramel sauce, so I figured, why not try to make a trifle?

And it worked. Though it wasn't until after I used ground ginger that I realized I had fresh ginger in the fridge. It was a hit at our party, though I think that it could have used a bit more rhubarb and the recipe reflects that chance.

Unfortunately, no pictures.

Gingered Rhubarb Trifle
serves 8?

1 lb rhubarb, cut into 1/4 inch slices
1/4 inch piece of ginger, or a pinch ground ginger
1/2 cup of water
3/4 cup sugar
4 cups 1-inch cake cubes (such as leftover cupcakes, pound cake, etc.)
1 cup heavy whipping cream
2 Tablespoons powdered sugar
1 Tablespoon finely chopped crystallized ginger, optional

In a heavy saucepan, combine rhubarb, ginger, water, and sugar and bring to a broil. Reduce heat and keep at a simmer until rhubarb is tender and most of the water has evaporated. Remove piece of ginger. Let cool.

Meanwhile, whip cream with powdered sugar until soft peaks form. Set aside in fridge.

In a glass bowl or trifle dish, place 1/2 of cake cubes. Top with 1/2 of rhubarb compote and 1/2 of whipped cream. Repeat layers with remaining cake, rhubarb, and cream. Sprinkle the top with crystallized ginger if using.

Cover tightly and refrigerate two hours or overnight.

Sunday, June 15, 2008

A Crumb Treat For Father's Day

Even though it's crumbly, it's not a crumby treat. (I just read Catcher in the Rye. That word was way overused in it.)

Yesterday, I bought a couple pounds of rhubarb at the farmer's market, and now I'm finding ways to use them (and the strawberries, which overnight turned to mush. Uh-oh!). The big crumb coffee cake and strawberry rhubarb pecan loaf on Smitten Kitchen both seemed like good ways to use them, as did the rhubarb and strawberry compote from Bon Appetit that I was going to make last night but didn't. The crumb cake seemed like a decadent father's day breakfast, since we normally have eggs prepared in one of a multitude of ways with lots of fresh veggies. Our usual breakfast "treat" is significantly healthier.

However, I couldn't resist, and I had a feeling that eggs and rhubarb wouldn't be the tastiest idea (maybe waffles with a rhubarb compote, but been there done that, well not with strawberries... never mind).

Unfortunately, as per usual, there was a little glitch. Cool completely before serving. Oops. So after eating half of the crumb topping waiting for my parents to get up so it would be super fresh and in the oven while we went for a walk, I noticed that sentence.
And then it started to pour. No, really. The kitchen got all dark and I had to turn on the light for the first time today at 7:30 in the morning even though they'd been off since I'd gotten up.

So off I went to assemble my crumble, and put it in the oven, though it was missing half of its topping.

Big Crumb Rhubarb Coffee Cake
adapted from Deb's adaptation at Smitten Kitchen
Serves 6-8
I ever-so-slightly improved the nutritional profile of the recipe. It now features whole grains! But it would still be better for dessert than breakfast.

For the rhubarb filling:
1/2 pound rhubarb, trimmed
1/4 cup sugar
2 teaspoons cornstarch
1/2 teaspoon ground ginger

For the crumbs:
1/3 cup dark brown sugar
1/3 cup granulated sugar
1 teaspoon ground cinnamon
1/2 teaspoon ground ginger
1/8 teaspoon salt
6 1/2 Tablespoons melted butter
1 3/4 cups whole-wheat pastry flour
2 to 3 tablespoons water

For the cake:
1/3 cup sour cream
1 large egg
1 large egg yolk
2 teaspoons vanilla extract
3 tablespoons oil
1 cup whole wheat pastry flour
1/2 teaspoon cornstarch (optional)
1/2 cup sugar
1/2 teaspoon baking soda
1/2 teaspoon baking powder
1/4 teaspoon salt
1 1/2 tablespoons softened butter, cut into 4 pieces

Preheat oven to 325 degrees. Grease an 8-inch-square baking pan. For easier removal, you can also line with overhanging parchment. For filling, slice rhubarb 1/2 inch thick and toss with sugar, cornstarch and ginger. Set aside.

To make crumbs, in a large bowl, whisk together sugars, spices, salt and butter until smooth. Stir in flour with a spatula. Add water so that flour is not dry, just enough for it to come together. It will look like a solid dough.

To prepare cake, in a small bowl, stir together the sour cream, egg, egg yolk, vanilla, and oil. Using a mixer fitted with paddle attachment, mix together flour, sugar, baking soda, baking powder and salt. Add butter and a spoonful of sour cream mixture and mix on medium speed until flour is moistened. Increase speed and beat for 30 seconds. Add remaining sour cream mixture in two batches, beating for 20 seconds after each addition, and scraping down the sides of bowl with a spatula. Scoop out about 1/2 cup batter and set aside.

Scrape remaining batter into prepared pan. Spoon rhubarb over batter. Dollop set-aside batter over rhubarb; it does not have to be even.

Using your fingers, break topping mixture into big crumbs, about 1/2 inch to 3/4 inch in size. They do not have to be uniform, but make sure most are around that size. Sprinkle over cake. Bake cake until a toothpick inserted into center comes out clean of batter (it might be moist from rhubarb), 45 to 55 minutes. Cool completely before serving.

Saturday, June 14, 2008

Ten-Minute Tofu

IMG_3124

I needed to use up some tofu in the fridge, and paging through Vegan Express at the bookstore, I saw what wasn't even called a recipe: it was simply a little paragraph on a page about simple tofu preparations.

Needless to say, I tried it with the tofu in the fridge, and it was super tasty. And super simple. I didn't even spend time pressing the tofu - all I did was blot it dry.
IMG_3117

What was it?
Easy. Cut the block of firm tofu into 1" slices, blot dry, and cube. In a pan, heat about a tablespoon each of maple syrup (or agave nectar), soy sauce, and olive oil. Toss in the tofu, stir to coat, and continue to cook until browned.

See? Super easy. Serve with something (atop a salad, noodles, etc).

Monday, June 09, 2008

Kohlrabi: Purple is my favorite color

IMG_3175

After taking two SAT subject tests Saturday morning (and I'm starting to regret not voiding them,) I wandered over to the nearby farmer's market in hopes of finding some rhubarb to make a rhubarb cobbler that I cut out of the paper a few weeks ago. I saw a few lonely stalks, but it seemed like what rhubarb there had been was gone.

However, on my second lap around the market, I saw an amazingly bright purple vegetable. I had to get it. I asked what it was. Kohlrabi. I'd heard of it, but I guess I'd just never seen it. It was gorgeous. (Apparently it can also be green, maybe that's why I'd never noticed it.)

But I didn't know what to do with it. The girl at the stand said she liked it raw with some salt, and that it as sort of like jicama. I thought it tasted more like a mild radish, but I guess that's kind of what jicama tastes like. It had greens attached to the top too, and she said I could use those like turnip greens or kale or any other big leafy vegetable. I was excited!

So tonight Dad and I took to the kitchen for Kohlrabi: 3 ways. It ended up being two ways, and with a side of what dad dubbed "Indian-Iranian shrimp."

We have the cobbler for dessert because I found some rhubarb at the grocery store, but I haven't tried it yet. It doesn't seem too promising.

IMG_3187
Kohrabi Salad
Mom dubbed this "white salad" because other than the strips of basil dad put on top, it was all white. Dad said it needs some red, so I suggested red quinoa. Mom likes it the way it is. It was a really tasty accompaniment to shrimp.
Serves 3-4 as a side.

2 medium kohlrabi, peeled and diced
juice of 1 lemon
1/2 cup quinoa
1/2 teaspoon salt
basil, optional

Bring a pot of salted water to a boil.
Rinse quinoa five times (is this necessary? My computer was off and I'd never made quinoa before and the first recipe in my recipe binder said that. I'd love to learn more about quinoa.)
Add quinoa to boiling water and cook for 10 minutes.

Meanwhile, in a small bowl, toss kohlrabi with lemon and salt. Once quinoa is ready, drain, and toss with kohlrabi mixture. Top with basil, if using.

Sunday, June 08, 2008

Grilled Portabello Sandwiches

IMG_3165

I don't remember seeing this recipe in June's cooking light, but when I was organizing the magazines, I saw a bookmark in it on the page. I'm glad I noticed it, because I made these for dinner on Friday, and they were tasty.

They took a bit too long, because our grill kept going out (maybe because of the wind? I don't know), but I can see making these again sometime soon. Probably because they took one of my favorite things to have on the grill (portabello mushrooms with balsalmic) and paired it with goat cheese, pepper, and basil, and then, grilled the sandwich so it's all toasty.
IMG_3152

And the skinny super tasty grilled asparagus that we ate while the sandwiches were on the grill only helped to make things better.

Grilled Portobello Sandwiches
serves 4

I didn't change anything, other than using one bun fewer and saving the leftover mushroom for lunch the next day, so I'm just going to post a link to the recipe on My Recipes.com because I'm tired and having trouble keeping my eyes open.
http://find.myrecipes.com/recipes/recipefinder.dyn?action=displayRecipe&recipe_id=1734337

Friday, June 06, 2008

AP European History

IMG_3111

I love my history teacher. This year was the second year I've had her (I had her for World History freshman year); she is pretty much the reason that I took Euro. And it was a terrific year in that class!

I'm sure you're wondering what this has to do with food. Was I inspired by history to be driven to the kitchen? And haven't I been out of school for a week?

After the AP test, my history teacher invites her classes over for dinner. She makes chili and rotini pesto, and six (or maybe it was seven?) different types of cookies.

The most popular, among my friends and I at least, were the ginger crackles, so before I left to head home, I asked her for her daughter's recipe. The next week at school, she presented me with a packet of the cookie recipes. I was thrilled!

So when finals rolled around and my English teacher told us we could bring in treats along with our game projects, as unseasonal as it seemed, I decided it was time to make Ginger Crackles (along with ever festive M&M cookies, of course.) While they didn't bide too well at school (hey, what can I say? They were in a plastic bag and competing with a cookie cake, popcorn, candy bars) they were a major hit at my parent's office. Spiced without being too spicy. Apparently the Germans really liked them.

IMG_3107IMG_3096
Ginger Crackle Cookies
Makes a few dozen. Don't remember exactly how many.
Note: I'm not calling these Shana's Ginger Crackles because I made some modifications, which didn't necessarily improve them, nor did it hurt them, based on what I had in the house. My dad really liked them and wanted me to record those changes. He'd never had them before. I'd run out of butter, so that necessitated that change... as well as the availability of the spice cabinet, allspice in place of cloves; and blackstrap molasses worksfine as well. Normally I make cookies with at least half whole-wheat pastry flour, but I used all-purpose this time. I think they would hold up to the WWPF though.

2 1/4 cups all-purpose flour
2 teaspoons baking soda
1 teaspoon cinnamon
1 teaspoon ground ginger
1/2 teaspoon allspice
1/4 teaspoon salt
1 cup brown sugar, packed
1/2 cup (1 stick) butter, softened
1/4 cup oil(well, I did 2 oz. by weight, it was slightly less I think. Or maybe it was more. I failed to take precise notes)
1/4 cup molasses
1 egg
1 teaspoon vanilla extract

about 1/2 cup sugar, for rolling

Preheat oven to 375F and line two cookie sheets with parchment or silicone liners.

In a medium bowl whisk together flour, baking soda, cinnamon, ginger, cloves and salt.

In a large bowl beat together sugar, butter, molasses, egg and vanilla until smooth. Add flour mixture and beat on low speed or stir until flour is incorporated.

Pour sugar in a small bowl. Shape 1 tablespoon dough into balls (if dough is too sticky, chill for 30 minutes before proceeding, but not too long or sugar won't adhere as well.) Dip each ball in sugar to coat the top.

Place balls 1 inch apart of cookie sheets, sugar side up. Bake 9-12 minutes, rotating halfway through, or until tops are cracked and dry to the touch and edges lightly browned. Let cool on pans one minute; transfer to wire racks to cool completely.